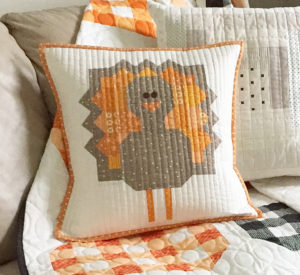
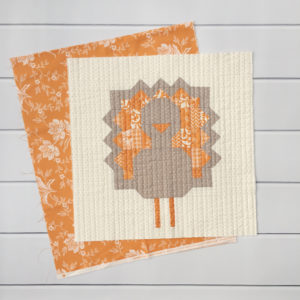
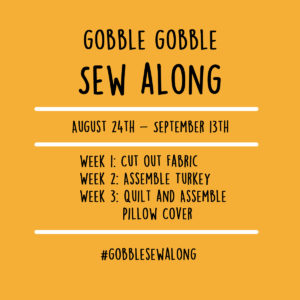
Here we are on the last week of the Gobble Gobble Sew Along! It’s been so much fun to see all of your turkeys pieced together and this week we get to turn them into pillow covers. I have just a few items that might help as you get started on your pillow cover.

The Gobble Gobble pattern includes instructions for an envelope pillow back, but if you’d like to finish off your pillow with a zipper instead, you can follow this tutorial I wrote in 2019 HERE. The tutorial is my go-to method for adding a zipper to a pillow cover and is seriously so fast and easy. Plus, with this method you won’t have to add binding on at the end. I’ll let you decide if not having to do binding is a good thing or a bad thing-haha! Don’t be scared off by the word “zipper” either! It’s absolutely something that you can do!

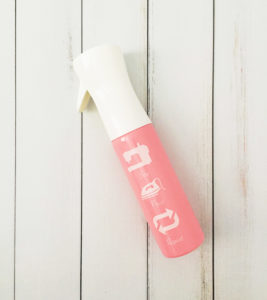
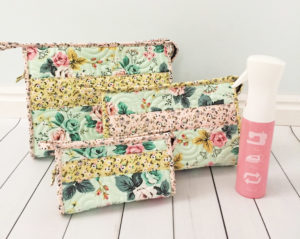
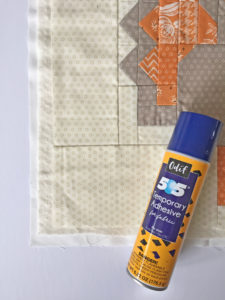
The zipper pillow tutorial also includes info on how I like to quilt my pillow covers. For my Gobble Gobble pillow, I quilted it just as described in the tutorial–complete with using my favorite Odif 505 spray for basting and Clover Hera Marker for marking the quilting lines.

In the past I have done a lot of pin basting, but after trying Odif 505 Basting Spray a couple years ago, I pretty much exclusively spray baste my smaller projects. It’s so convenient and simple to use that I only use pins if I don’t have any Odif 505 around. A full step by step on how I use it can be found on my zipper pillow tutorial HERE.

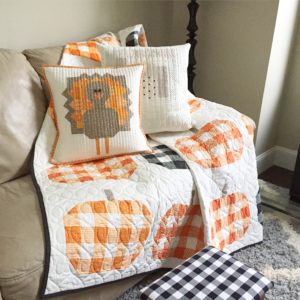
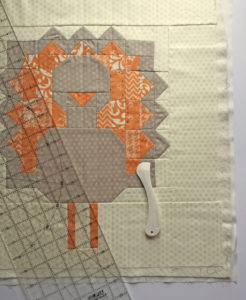
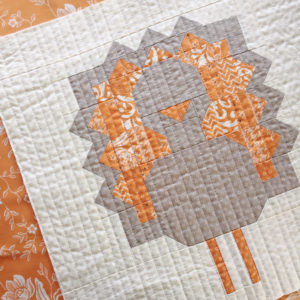
I’m also in love with using the Clover Hera Marker for marking lines for straight line quilting. I combine it with a long ruler to make indents exactly where I want to quilt on my basted panel (can you see the faint lines on the right half of the turkey below?). Generally, I’ll make lines 1″ apart from each other, quilt straight lines right on top of those lines, then go back quilt in between the 1″ lines to get 1/2″ quilted lines across the top (I just eyeball the lines in between by keeping my walking foot evenly spaced between the quilted 1″ lines). Now that I have my routine down for straight line quilting, it all goes pretty smoothly and I really enjoy the process.

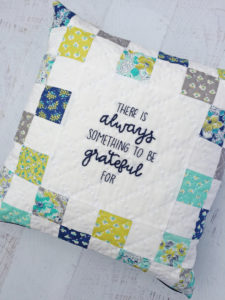
You can, of course, hand quilt your turkey instead! I’ve gone that route with several pillow covers and hand quilting definitely adds such a nice touch. Below, I’ve included a photo of a pillow I finished just last month where I hand quilted a crosshatch design. I spray basted with Odif 505, used the Hera marker to help me keep track of where I wanted the hand quilting to go, then followed the indented lines with a needle and embroidery thread.

After quilting, you’ll want to trim all three layers (pieced turkey, batting, and lining) to the same size. Don’t worry if the top doesn’t measure exactly 18″ when you trim. Quilting frequently causes the layers to shrink in a bit, so don’t be surprised if one or both sides are smaller than 18″. I generally just trim to the edge of the top pieced section, trying my best to square up the edges as I go.

After the quilting and trimming is done, it’s time to add the button eyes. Place them about 1/2″ above the flying geese beak and sew them on with a matching thread color–you don’t need fancy thread or anything, just whatever you have on hand. After the eyes are on, you can go ahead and finish off the pillow by using the envelope back instructions in the pattern, the zipper tutorial HERE, or your own favorite way to make a pillow cover.

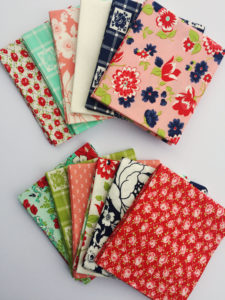
There really are so many fun options for finishing off your Gobble Gobble turkey and I’ve been excited to already see some finished pillow covers pop up on the #gobblesewalong hashtag! For this week’s giveaway, I have an awesome bundle of ten fat quarters from the Flurry line by Ruby Star Society up for grabs. You have until next Monday, September 14th to post any progress or finished pillow photos to be entered to win.

Happy sewing!


This post contains affiliate links

It’s week 2 of the Gobble Gobble Sew Along and we’re piecing our cute little turkey together this week! Today I’m sharing a few tips to keep in mind as you get sewing.


Whenever I sew together tiny pieces, I like to press the seams open. Pressing the seams open helps reduce bulk at the intersections and your turkey will lay flatter. I also feel that it improves accuracy when you’re dealing with such small pieces of fabric. As you can see from the photo below, I didn’t press every seam open. If I have a larger seam and it makes more sense to press to the side, I’m happy to do that, instead. 🙂

Remember to keep the seams at 1/4″. Whenever I deal with sewing tiny pieces together, I naturally start to decrease my seam allowance. I have to remind myself that even though the fabric pieces are tiny, the seams still need to be 1/4″. Even as I was piecing my turkey together a couple days ago, I realized that my feather units were a little too long because my seams were too small. It’s an easy fix though–just resew the seam at the correct 1/4″.

As you finish up your turkey, don’t be concerned if the finished size isn’t exactly 18.5″ x 18.5″. There are so many seams in there that it’s hard to keep everything right on target! Just keep the pillow front as is (don’t trim it) for the quilting we’ll do next week. It’s likely that the panel will be a touch smaller after quilting (quilting usually causes it to shrink a bit) and that’s totally fine. We’ll square everything up after quilting and it really doesn’t matter if your pillow cover ends up being a bit smaller than the suggested 18″ x 18″.

This week, I’m giving away two bundles of fat quarters from the new Shine On fabric line from Bonnie and Camille, so don’t forget to tag your photos on instagram with the hashtag #gobblesewalong!

Happy sewing!

Ready. Set. GO! It’s officially the start of the Gobble Gobble Sew Along and I’m so excited to have quilters from around the world joining in!

This week we are cutting out our fabric. If you’re still waiting on fabric to arrive in the mail, don’t worry! The cutting goes super fast and you’ll be able to catch up quickly. As I mentioned last week in the fabric tips post, I used a charm pack of All Hallow’s Eve for my orange prints. It made the cutting go even faster than I expected because I was dealing with smaller pieces to start with instead of trying to wrangle yardage.

If you are working from the pattern in my Etsy shop (as opposed to the pattern in Fall 2019 Quilts & More), you’ll notice that the last page has some helpful labels to cut out. I love to include these in my patterns that have lots of tiny pieces as they are really useful for labeling your pieces as you cut them out. When you have a pattern with lots of small, differing sizes of cuts, organization is key! These little notes help keep me on track (and help keep me sane, too). 😉 I usually just set them on top of the corresponding pile, but I’ve also pinned or clipped them to their stacks if I’m afraid they’ll get blown off from an open window (or kids wildly running by).

The Gobble Gobble pattern labels include the color of fabric, size and number of pieces to cut, and the letter the piece is referred to in the pattern (although, you might notice in the photo above that I erased the dimensions of the cut pieces to encourage readers to purchase the pattern instead of just looking here to figure out the dimensions based on the photo). 🙂  The below photo shows what the labels look like.

Personally, I like to wait to cut out the binding and backing/pillow back until I have the front finished. I am perpetually indecisive and always feel like I need to audition different options once the front is completed. Haha. So while I already have the front all cut out, I’ll wait on the rest just to make sure my mind is made up before I commit.

As you get started cutting into your fabric, remember to post your photos on instagram with the hashtag #gobblesewalong to be entered to win the weekly prize! Instagram quilter @christine.a.sherman was last week’s winner of a Gobble Gobble Pillow kit and this week, I’m giving away two bundles of six fat quarters each from the Midnight Magic line by April Rosenthal. Just in time for some more fall sewing!

Enough talk. . . let’s get those pieces cut!

Before we get started on the Gobble Gobble Sew Along (get the pattern HERE and you can sign up for the sew along HERE), I wanted to chat briefly about the fabric requirements–particularly for the front of the pillow.

The fabric requirements for the turkey direct you to get 1/4 yard total of assorted orange prints, and you can accomplish that several different ways. For my original Gobble Gobble pillow, I used all scraps from my stash! The orange pieces to be cut are all pretty small, so they are perfect to use up some orange scraps and as a bonus, you’ll get a good variety of prints to give the feathers a nice, variegated look.

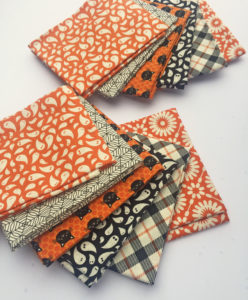
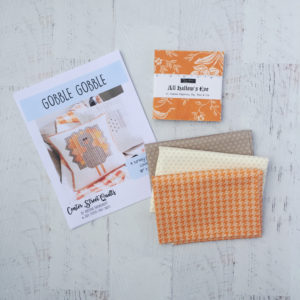
Another way to get a good variety of orange prints is to cut what you need from fat quarters or yardage in your stash. If you are going for certain shades of orange, you can easily pick out your desired oranges and follow the cutting instructions using only those prints.

For the sew along, I’ve decided I’m going to be using charm squares (5″ x 5″ squares) for my orange prints. I picked up a charm pack in All Hallow’s Eve by Fig Tree & Co. as I love the shade of the oranges in it and there are also a good amount of orange squares to still have a nice variety of prints.

If you’d also like to use charm squares for the orange fabric requirement, I did a little math and figured out that at the very least you need six 5″ x 5″ orange squares. However, I’d recommend using 8-10 squares to get a better variety of prints and have a little bit of wiggle room when cutting the pieces out.

For all of the other fabric requirements, I’d recommend getting yardage as indicated in the pattern. The brown fabric has one piece to cut that’s larger than a charm square, so charm squares and other scraps wouldn’t work quite as well for the brown fabric.

Are you joining in? We’re starting on Monday, August 24th and will work on getting all of our fabric cut out that first week. Remember to post your weekly photos on Instagram using the hashtag #gobblesewalong to be entered to win prizes!

Happy sewing!

Do you remember my Vintage Checkerboard quilt pattern from the Best of Moda Bake Shop book? It’s a quick pattern that uses precut jelly roll (2.5″) strips and finishes at 72″ x 84″. You can find the full instructions in the book along with fifteen other fun precut friendly patterns.

The designers of the other quilts and I are participating in a Moda Bake Shop pillow parade event to showcase our quilt designs re-imagined into pillows. Pillows are one of my favorite things to make (they are fast and pack a big decorating punch) so of course I was up for the challenge!

For my Vintage Checkerboard pillow, I used the fabric line Flour Garden by Linzee Kull McCray for Moda and instead of keeping the center background square blank, I decided to add a fun hand embroidered saying. Some crosshatch hand quilting and a zipper in the bottom finished it off nicely. Super simple, but I love that it can be used year round or made with holiday fabrics (and a blank center or different embroidered saying) for a seasonal pillow.

This little pillow was so fun to make that I wanted to share my hand-lettered quote file for anyone else wanting to embroider it on their own pillow or project! You can click below to download the PDF file then transfer it onto a piece of solid fabric (I like using Frixion pens–they are erasable with a quick touch of a hot iron) and go to work embroidering!

Click here for the Always Grateful Embroidery PDF file

Happy sewing!


Are you ready for fall yet? Although I’ve been enjoying summer, I am always up for some fall sewing! The first thing on my list for fall sewing is my new Gobble Gobble Turkey Pillow Cover! This cute turkey pillow was featured in the Fall 2019 issue of Quilts & More and I’m so excited to now have the pattern available in my Etsy shop.

The Gobble Gobble Turkey Pillow cover finishes at 18″ x 18″ and is such a fun addition to your fall decor. The pattern has all traditional piecing (no foundation paper piecing) and is a great way to use up some scraps! The pattern has clear, easy to follow directions and full color graphics to guide you through all the steps.

There was so much excitement last year about this pillow that I’ve decided to host a sew along this year! We’ll start on Monday, August 24th and will have three weeks of sewing, tips, and of course prizes!

You can get the Gobble Gobble pattern in my Etsy shop HERE and sign up for the Gobble Gobble Sew Along HERE. I’ll be sending out weekly emails for the sew along to keep us all on schedule and give tips and tricks where needed. And remember to tag all of your social media sew along images with #gobblesewalong to be eligible for the weekly prizes. I’m so excited to get started and hope you are, too!

P.S. If you sign up for the sew along or share the information on social media (tag me and use the hashtag #gobblesewalong on instagram or facebook when you share), you’ll be entered to win a kit to make the front of the turkey pillow!

Happy sewing!


The Best of Moda Bake Shop book is here and I’m honored to have one of my quilts included! The book has fifteen precut-friendly projects, each by a different quilt pattern designer. There’s a wide variety of projects and definitely something for everyone! The cover quilt uses two charm packs (5″ squares) and was designed by Christine Weld. I absolutely love those cute houses and can’t believe you only need two charm packs to make them all!

The quilt that I designed is called Vintage Checkerboard. It’s part checkerboard, part Irish Chain, and super easy with a precut jelly roll! The fabric is Scarlet & Sage from Fig Tree for Moda fabrics and the background is Moda Bella Solid in Ivory. I love that the fabrics go so well with the vintage/heirloom feel of the quilt.

One of my favorite projects from the book is this mini quilt, Christmas Baubles, by Jen Daly. It uses one mini charm pack and is such a cute way to use those little squares of fabric! This quilt would also be perfect to use up scraps or for fussy cutting some favorite Christmas fabric to make the ornaments.

Another favorite is Twin Pop by the mom/daughter duo Diane Brinton and Audrey Mann. Seriously, such a fun quilt, right?!? Twin Pop uses jelly roll strips and has such a clever construction to make the popsicles look 3D.

The Best of Moda Bake Shop book is available now–ask for it at your local quilt shop or find it online HERE.

Happy sewing!

I’ve been into bag making recently and the process seems to work really well with my current day-to-day schedule. I can do one step, go help the kids with schoolwork, do another step, get dinner ready, etc. Each little step feels like a lot of progress and before I know it, I have a whole project completed!

As I’ve worked my way through making bags, I’ve found that when I try to iron small binding strips or other tiny pieces, my steam iron (which I love) has a tendency to blast steam on my poor fingers. It’s hard to hold those tiny pieces in place with the iron so close and not have the steam burn me.

Enter the Misting Spray bottle!! I have never owned a misting spray bottle before, but I immediately fell in love with this one from Riley Blake Designs. I gently mist the fabric, iron it without steam and can still get crisp pressed lines while saving my fingers from burns. I definitely call that a win!

I know a lot of quilters also love their misting spray bottle to use with liquid starch spray. I generally don’t use starch, but can imagine that misting a piece of fabric would be more effective than spraying with a regular spray bottle. You’d get a more uniform spray and use less starch, too.

These Open Wide pouches (By Annie pattern) were the perfect project to break in my RBD Misting Spray bottle! The pouches have lots of small binding strips to iron and the misting bottle saved my fingers from the steam of my iron. For these Open Wide pouches, I used the new Splendor fabric line by Jen Allyson and am in love with the charming florals and gorgeous colors.

You can find the Open Wide pouch pattern on the By Annie website HERE and check with your favorite local or online quilt shop for the RBD Misting Spray Bottle and Splendor fabric.

Happy sewing!


Baby quilts have always been a favorite of mine to make. They are fast to finish and a great way to feel productive. 🙂 Lately, I’ve been loving the cute panels from Riley Blake Designs. For this baby quilt, I used the new Noah’s Ark panel with just one yard of a coordinating print from the line as the border. It was as easy as it is cute!

I used navy Dreamy Minky for the backing, quilted some raindrops (how could I resist using the raindrop quilting design?!?) and added the navy and light blue raindrops for the binding.

The Noah’s Ark line has three different colorways for the panels plus a bunch of darling coordinating prints. See that rainbow raindrop print above? That’s a favorite of mine that I’m bound and determined to use for another project. Stay tuned to see what I have planned. 🙂

Pinwheel quilts hold a special place in my heart. One summer when I was a teenager, I asked my mom if she’d teach me how to make a quilt. I looked through her quilt books and fell in love with the pinwheel block. After picking out some 30s reproduction prints, I made my first ever quilt–a simple pinwheel quilt.

My new quilt pattern, Windy Day, is a fun reminder of my first pinwheel quilt. Windy Day has a bit more pizazz thrown in, though. 🙂 With the blocks set on point and the smaller pinwheels in the sashing, this quilt top reminds me of an array of pinwheels, all blowing in the wind.

Windy Day was originally designed for Quilts and More magazine, where I made an aqua and red Christmas version. To release the Windy Day pattern in my Etsy shop, I wanted to make a more spring-like version and chose the new Riley Blake fabric line Charmed. It features pretty corals and navy blues and I added in Sweet Mint Shabby fabric for the background (also from Riley Blake).

You can find Windy Day in my Etsy shop HERE.

Happy sewing!