Welcome to Day 1 of the Good Luck Pouch Sew Along! I am so happy you’re here!
I originally posted these Sew Along tips and tricks in September 2025 in conjunction with a Good Luck Pouch Sew Along I hosted. I’m posting the daily assignments and bonus tips here to my blog for easy reference and for those who didn’t get a chance to join the Sew Along as it was happening. You can find the Good Luck Pouch pattern HERE and follow along with the Sew Along Blog posts to make your own!
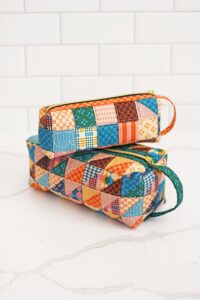
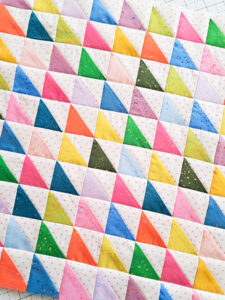
The assignment for the Good Luck Pouch Sew Along Day 1 is to make the half square triangles (HSTs) then sew the HSTs or patchwork squares together into a panel (pages 4 and 5 in the PDF pattern). If you are choosing to make the Solid fabric version, you can skip ahead to day 2. Lucky you! 😉
A few notes about assembling the half square triangles and sewing all the squares together:
If you haven’t made half square triangles before, I have a video that shares the process from start to finish on Instagram that you can watch HERE. Even if you’re not making the HST version of the Good Luck Pouch, I’d recommend getting two squares and try making a half square triangle at least once. You can do it!!!
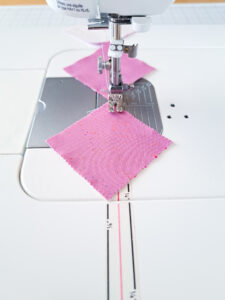
In the Good Luck Pouch pattern when preparing the HSTs, it directs to draw a line corner-to-corner on the wrong side of the squares before sewing 1/4″ away down both sides of that line. This method works really well for creating your HSTs, however I’d like to show you a little tool that can speed up the process a little. In the photo below, you’ll see a pair of squares stacked on top of each other and ready to be sewn, but I don’t have a line drawn on the top square to follow. Instead, I’m using the lines from the tape placed on the throat plate area of my sewing machine. This tape is called Diagonal Seam Tape by Cluck Cluck Sew. The red line on the tape is lined up with my needle, while the black lines on either side are 1/4″ away from the needle/red line. With the tape placement, I can line up the edge of fabric or the corner of a square with the 1/4″ line and know that I’m sewing a 1/4″ seam. You can see the bottom corner of the square is lined up with one of the black 1/4″ lines. As I sew the square and the fabric advances through the needle, I make sure to keep that corner on the black line. The Diagonal Seam Tape really is a useful tool and can save a bunch of time!
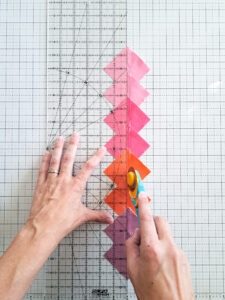
Making a lot of half square triangles can get tedious and I’m always looking for ways to speed up the process. When you cut the HSTs in half, you can carefully line up a small stack of them, use a ruler, and slowly cut down the middle, as shown below.
Trimming the half square triangles to size after pressing them could very well be the most unexciting task of making a Good Luck Pouch. Haha! However, it’s worth it to take the time to get them all trimmed, as you’ll be much happier with how they sew together into a panel. I like to use a square OLFA ruler, as they have a diagonal line printed on the ruler. I line up the diagonal seam on the HST with the diagonal line, trim the right and top edges, then flip the HST 180°, place the ruler back on top, and trim the remaining two sides. Please know that this is my preferred way to trim and you might find a different way that you like better! There are other tools that many people enjoy using for this step, such as a Bloc Loc Ruler or a rotating cutting mat.

When you are sewing the HSTs or patchwork squares together, chain piecing will be your friend! Chain piecing is when fabric pieces are sewn together continuously, one after another, without cutting the thread in between pieces. This will save you not only time, but thread too! I found a great tutorial on YouTube by Lo and Behold Stitchery that shows how to chain stitch your entire panel (sometimes also called web stitching). You can find that video HERE.

After you’ve sewn together your HSTs or patchwork squares, you’re ready for Day 2 of the Sew Along!
Those are my tips for Day 1. You can find the Day 1 Sew Along video posted on my instagram account HERE and a bonus Day 1 video HERE.
Links for products from today’s tips:
Diagonal Seam Tape (click HERE)
OLFA Ruler 6″ x 24″ ruler click HERE or 6.5″ x 6.5″ square ruler click HERE
Oliso Mini Iron (click HERE)
Juki TL2000 Sewing Machine (click HERE)
Organ 90/14 sewing machine needles (click HERE)
Thanks for sewing along with me!
Kristina