It’s Day 2 of the Nightingale Zipper Case Sew Along and today we are prepping the Binding, Handle, and Strap (all of the Accent fabric parts), along with making Vinyl Pocket 1.
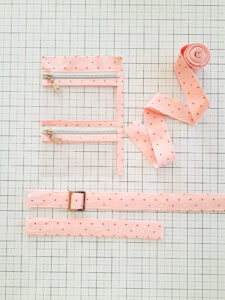
The Binding is pretty self-explanatory, but I did want to mention a couple things.
First, feel free to use different fabric prints for the different binding pieces. This is a great place to use up scraps, and it will just add to the personality of your bag!
Second, since there are so many Binding pieces for this pattern, the instructions direct you to press first then cut to size. Personally, I find it easier to press the long, width of fabric strips first, then cut the right length, but of course you’re welcome to cut the strips prior to pressing if you like that order better. It’s all about what YOU prefer!
And third, one fun option for the webbing is to use a coordinating webbing–which means you don’t have to cover it with fabric! Yay! If you choose to use webbing without the fabric over it, you’ll just want to make sure you seal the raw end of the Strap opposite of the strap slider. For poly webbing like the photo below, you can use a flame to heat seal it by melting the end a little. For cotton webbing, you can sew a zigzag stitch along the end or use Fray Check to keep the end from fraying.
Today, we’re also making the Vinyl Pocket 1, which is the pocket with two zippers. If you’ve made my Atlas Zipper Case pattern, this pocket is almost identical to one of the pocket panels there, so it will feel very familiar.
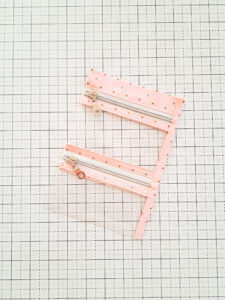
For all of the Vinyl Pockets, I’ve purposefully made the Binding, vinyl, and zippers a little larger than necessary. Making it oversized uses only slightly more material, but results in a much nicer finished product. It’s hard to get all those bindings to line up perfectly with the zipper and vinyl without having any wiggle-room! So, starting off larger and then trimming to size is my preferred method when dealing with many different pieces. The increased size of the vinyl also helps account for variations in the width of zipper tape. We don’t want any Vinyl Pockets to end up too small!
If you’re new to working with vinyl, here are a few tips:
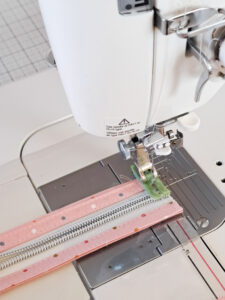
- When vinyl is sewn through, the sewing machine needle makes a hole in it. Unlike sewing through cotton fabric, the puncture made in vinyl is permanent and easily visible if the thread needs to be taken out of the seam. For this reason, I always sew extra slow when sewing with vinyl so as to minimize the chance of having to redo any seams. In most instances for the Nightingale Zipper Case, if you sew one of the bindings on the vinyl and make a mistake, you can likely seam rip the thread out, then cover the existing holes in the vinyl with the binding fabric.
- For holding vinyl pieces in place, I frequently use Wonder Clips, but never pins. As I’m sure you have guessed by now, the pins will put a permanent hole in the vinyl.
- I always use my regular Organ brand 90/14 needles when sewing vinyl. I would guess that sewing through vinyl would make the needle get dull faster, but Organ brand needles are really inexpensive (link HERE), so they are still economical if you’re changing them regularly.
One additional tip: After finishing the Vinyl Pocket 1, I like to quickly sew a few stitches across the open end of the zipper teeth. This helps keep the open end from flapping around and will be especially useful when attaching it to the quilted panel. In the photo below, I’m sewing a quick forward stitch and backstitch across the zipper teeth to close the open end (the zipper teeth look metal, but they are plastic, so I’m good to sew right across them).
That’s it for tips today! I have two videos for Day 2 of the sew along. You can find the videos on instagram (part 1 and part 2) or Facebook (part 1 and part 2).
I’ll be back tomorrow with a few more notes and photos about working with vinyl for assembling the other two Vinyl Pockets.
Links for products from today’s assignment:
Tube Turner (shown in my video for turning the Handle and Strap right side out)
Clover Wonder Clips
My favorite vinyl to use (ByAnnie brand 16 gauge vinyl)
Organ 90/14 needles
Zipper by the yard from these photos
Wild Honey fabric by Lella Boutique for Moda
Thanks for sewing along!
Kristina