It’s Day 3 of the Nightingale Zipper Case Sew Along!
Today, we are making Vinyl Pockets 2 and 3. The process is pretty similar to making Vinyl Pocket 1 yesterday, however Vinyl Pockets 2 and 3 will each be sewn to an Inside Pocket Quilted Panel.
A couple notes about the Vinyl Pockets 2 and 3:
As with the Vinyl Pocket 1, the vinyl and zipper portions of Pockets 2 and 3 will be made a little larger than necessary. Trust me, the extra width and length is worth it to get nicer looking pockets and less frustrations. 😉 After sewing the vinyl + zipper unit to the Quilted Panel, trim off any ends that overhang the Quilted Panel.
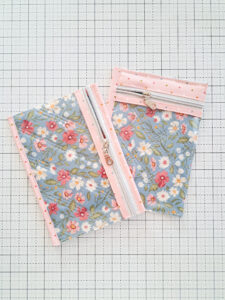
Vinyl Pocket 2 will have Bindings added to both the left and right sides (see photo above, Vinyl Pocket 2 is on the left), while Vinyl Pocket 3 only has binding added to the left side (as shown above, Vinyl Pocket 3 is on the right of the photo).
To round off today’s tips, I have a few more notes on working with vinyl:
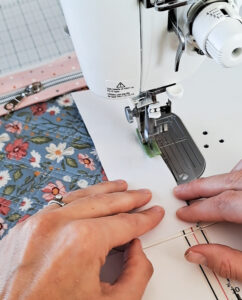
- Vinyl has a tendency to cling to certain surfaces, including your presser foot and needle plate. If you’re sewing on vinyl that’s facing up, you’ll want to make accommodations so the vinyl doesn’t stick to the presser foot. I use either a non-stick presser foot, or small strips of thin paper in between the vinyl and presser foot. The paper will keep the vinyl from sticking to the presser foot-you can sew right through it then gently tear the paper away after finishing the seam. I used the paper strips method for years before finally purchasing a non-stick presser foot. In the photo below, you can see the strip of paper in between the presser foot and vinyl (the paper doesn’t need to be that wide–I literally pulled this strip out of my trash can and didn’t bother cutting it smaller first). Using paper is such an easy method and works great!
- If you’re sewing with the vinyl face down against the needle plate and machine bed, there are products that are made to make your machine bed more slippery so the vinyl doesn’t stick to the sewing machine. I haven’t used any of these products, so I can’t speak to their effectiveness, but did want to mention them in case anyone wants to check them out (I’ve heard of both a spray and a slippery mat that lays on top of the machine bed). Instead, I prefer to gently pull on the side of the vinyl that’s made it through the needle to help the piece travel under the needle without sticking too much to the needle plate. It might also help to check your presser foot pressure. If your presser foot is pushing down really hard against your vinyl/fabric, then the vinyl will be more likely to stick as it goes through the needle.
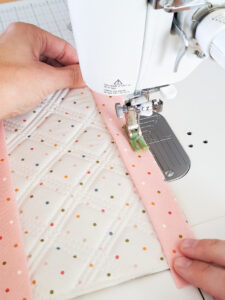
- In the photo below, I am attaching the Binding to the side of one of the vinyl pockets. The piece of vinyl is face down against the needle plate, and it was sticking slightly to the machine bed. You can see my left hand gently pulling the piece through the needle, helping out those feed dogs push the vinyl through. I’m also lifting the panel up a bit to try to keep the vinyl off of the machine bed as much as possible. Just make sure you aren’t pulling too hard, as you don’t want to bend your needle and cause it to break–the goal is to just gently help the vinyl so it doesn’t stick as much. You can also use the paper trick here, too! Put a piece of paper under as much of the vinyl as you want, and the vinyl won’t have a chance to stick to the bed.
That’s it for today! Check out the Day 3 video on Instagram HERE or Facebook HERE.
Links from today’s post
Clover Wonder Clips
OLFA frosted ruler
OLFA rotary cutter (I have one for fabric and one for paper/zippers)
Zipper by the yard (looks metal, but has plastic teeth!)
Vinyl (By Annie brand 16 gauge is my favorite)
Wild Honey fabric by Lella Boutique for Moda
Thanks for sewing along!
-Kristina