Welcome to Day 2 of the Hemingway Pouch Sew Along!

Today’s assignment is to quilt our basted panels then trim to size. Whenever I’m quilting fabric for a bag, I always start off with a bigger size than necessary, then trim to size after quilting. The process of quilting often shrinks the panel (the denser the quilting, the greater the shrinkage), and sometimes the layers shift a little, too. The extra size is always built into my patterns, so no need to cut even larger than the Cutting Instructions given.
When you are trimming to size (both when trimming using the table on page 3 and when trimming the diagonal corner off), pay close attention to the width and height dimensions given. This will tell you how to orient your fabric so it is cut correctly. Please note that the small size is the only size that is taller than it is wide, so make sure you position your quilted panel accordingly.
Let’s get to some tips on the quilting now!
MARKING QUILTING LINES
When I’m quilting a design that needs guides to follow, I like to use a Hera Marker to mark my lines (it only leaves an impression-not an actual ink mark). The dull side of a butter knife also works great!
There are many other ways to make guide lines (air/water erasable pens, strips of tape, etc.) or forgo the lines altogether and choose an organic design that doesn’t need lines to follow. If you’d like to see some of these other method in action, check out the video I shared on my Instagram account HERE.

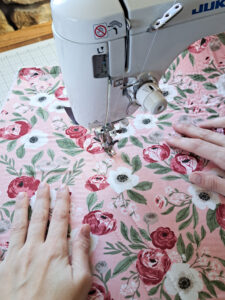
QUILTING
To keep things easy when I quilt, I use the same thread and needle that I use for all of my general sewing projects (my thread of choice is Aurifil 50 wt and I like a 90/14 needle).
For machine quilting, I do like to increase my stitch length a little. A standard stitch length on my machine is 2.5 and I like to increase it to about 3.5 for quilting. You can play around with your machine’s settings to see what you prefer.
When quilting on my Juki sewing machine, I use a slim presser foot to quilt smaller projects. The Juki comes with a walking foot, however I’ve found that it doesn’t work really well and I prefer to use a regular presser foot. If I’m quilting a larger foot then I get out a Bernina that I also own and use it with a walking foot. The walking foot can really help feed the layers through at the same speed and avoid puckering. If you have a walking foot, I’d generally recommend using it to quilt, or at least trying it out to see if it works better for quilting.
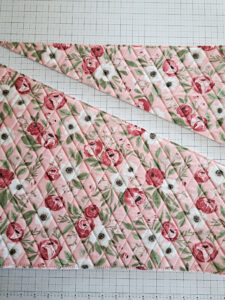
TRIM THE QUILTED PANEL
When you’re finished quilting, trim your quilted panel to the size listed in the table on page 3 of the Hemingway Pouch pattern. Again, note the dimensions of width x height to make sure that your panel is oriented correctly!
Then measure and trim the diagonal corner off. If you’re making the small size, pay close attention to the width x height and orientation of your panel before you cut. It’s the only size that is taller than it is wide.
If you’re making the Large or Extra Large size, keep the diagonal triangle you cut off because I’ll be sharing an easy way to turn that into a mini pouch on Day 5.
Those are my tips for Day 2! You can find the Instagram video that accompanies today’s assignment HERE.
Links for products from today’s tips:
Olfa Ruler (click HERE)
Hera Marker (click HERE)
Organ 90/14 needles (click HERE)
Juki Sewing Machine (click HERE)
Thanks for sewing along with me!
-Kristina