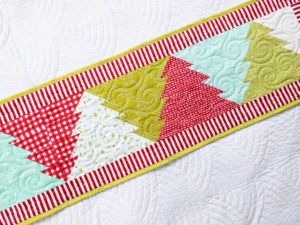
The only thing I love more than a Christmas sewing project is a fast Christmas sewing project! Table runners and pillow covers have long been favorites of mine because they are quick to make and fun to change out with the seasons.
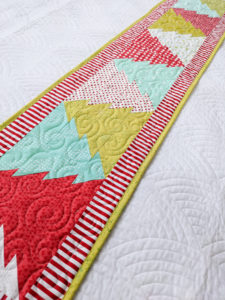
Today, I’m sharing a fast and easy Christmas Tree Table Runner tutorial! These cute trees are the perfect block for a table runner since there are right side up trees when looking at it from either side (a crucial element for a table runner pattern, in my opinion). 😉
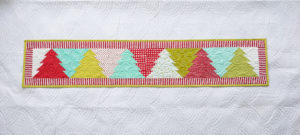
The trees are all made from 2 1/2″ strips, so the pattern is a great stash buster, too. I made each of my trees from a single print, but the trees would look great with scrappy prints in the same color, too! I’ve even included a downloadable PDF Coloring Page at the end of the post to easily test out color combinations before cutting fabric.
Enough talk–let’s get right to the tutorial:
Christmas Tree Table Runner Tutorial
Finished Block Size: 10″ x 8″
Finished Table Runner Size: 64″ x 12″
All seams are 1/4″
Width of fabric is abbreviated as WOF and is assumed to be 42″
A PDF Coloring Page is available as a download at the end of this tutorial
Materials Needed:
- Christmas Trees: (12) 2 1/2″ x WOF strips (one for each tree)
- Border: 1/3 yard
- Backing: 1 yard
- Batting: 18″ x 70″ piece
- Binding: 1/3 yard
Cutting Instructions:
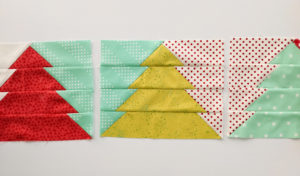
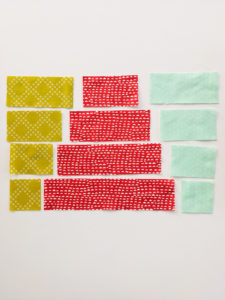
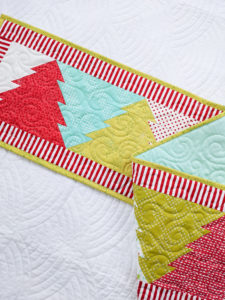
- Choose (6) of the 2 1/2″ strips to be the main trees and (6) to be the upside down trees. It helps to lay out the strips in the order you’d like them in the table runner. Starting with the first strip, every other one will be a main tree. The remaining strips will be the upside down trees. The last strip will be a partial upside down tree with half at the beginning of the table runner and half at the very end of the table runner. The photo below shows how the main and upside down trees will be assembled into blocks with the upside down trees spanning two adjacent blocks.
- Cut each of the (6) 2 1/2″ x WOF strips for the main trees into:
- (1) 2 1/2″ x 10 1/2″
- (1) 2 1/2″ x 8 1/2″
- (1) 2 1/2″ x 6 1/2″
- (1) 2 1/2″ x 4 1/2″
- Cut each of the (6) 2 1/2″ x WOF strips for the upside down trees into:
- (2) 2 1/2″ x 5 1/2″
- (2) 2 1/2″ x 4 1/2″
- (2) 2 1/2″ x 3 1/2″
- (2) 2 1/2″ x 2 1/2″
- Cut the border fabric into:
- (4) 2 1/2″ x WOF strips. Cut (2) 2 1/2″ x 8 1/2″ pieces for the left and right borders.
- Cut the binding fabric into:
- (4) 2 1/2″ x WOF strips.
- Cut the backing fabric into:
- (2) 18″ x WOF strips.
Assembly Instructions:
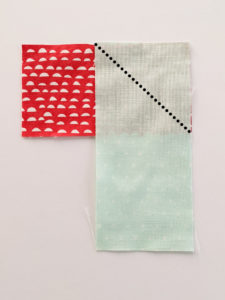
1. Lay out the pieces for the first main tree, along with the pieces for the adjacent upside down trees as show below. The main tree pieces will go from shortest to longest (2 1/2″ x 4 1/2″ piece on the top) and the upside down trees will go from longest to shortest (2 1/2″ x 5 1/2″ piece on the top).
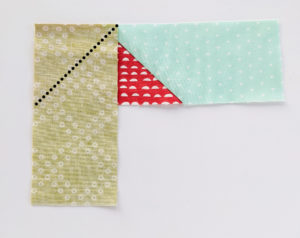
2. From the top row, flip the upside down tree segment from the right side of the block on top of the main tree piece, right sides together, with the right edges lined up. Draw a line on the wrong side of the upside down piece as shown below (the line goes from the top corner of the upside down piece down to the bottom corner of main tree piece).
3. Sew directly on the drawn line, trim off the excess corner 1/4″ away from the seam, and press away from the main tree fabric.
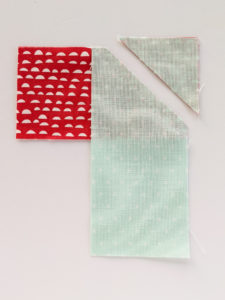
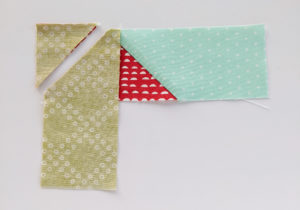
4. Repeat with the remaining main tree and upside down tree pieces from the right side of the block.
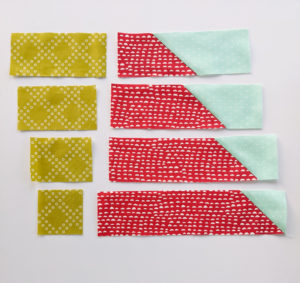
5. Repeating the process for the upside down tree on the left side of the block, first flip the upside down tree piece on top of the main tree unit, lining up the left edges.
6. Sew a line on the diagonal, trim off the excess corner, and press away from the main tree fabric.
7. Repeat with the remaining upside down tree pieces on the left side of the block.
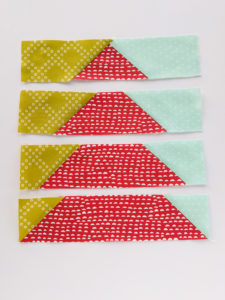
8. Sew the four tree pieces together and press the seams down. The completed block should measure 10 1/2″ x 8 1/2″.
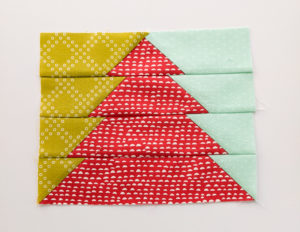
9. Repeat the process for the remaining six blocks, pressing the final block seams in an alternating order (first block press seams down, second block press up, etc.). Remember to keep your cut pieces in order as you assemble the blocks so the fabric for the upside down trees transitions from block to block.
10. Sew the blocks together into one long row. Press seams open.
11. Gather the border strips. Sew the 2 1/2″ x 8 1/2″ border strips onto the left and right sides. Press seams toward the border.
12. Gather the remaining 2 1/2″ border strips. Sew one long strip and cut into (2) 2 1/2″ x 64 1/2″ border strips.
13. Sew the long border strips to the top and bottom of the table runner, press toward the border strips.
14. Layer the table runner with the batting and backing. Baste the layers and quilt as desired. Trim the batting and backing to line up with the table runner top.
15. Sew the binding strips end to end and press in half the long way with wrong sides together. Sew binding onto the front side of the table runner, fold binding over the raw edge of the table runner to the back and stitch into place by hand.
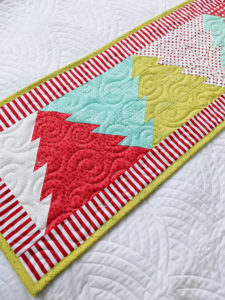
Your finished Christmas Tree Table Runner should measure 64″ x 12″.
It really is surprising just how fast these little trees sew up! Before you know it, you’ll have one made for your home. Plus maybe a few more as gifts. 😉
As promised, you can download and print out the Christmas Tree Table Runner Coloring Page below. It’s the perfect chance to test out different color options and get the order of your trees just right before committing to the design.
Christmas Tree Table Runner Coloring Page
If you make your own table runner from this tutorial, please tag me in your social media posts! I always love to see your creations!
Happy sewing and Merry Christmas!
Kathy says:
This is adorable! Thanks so much for sharing!
Trish says:
Thank you for the pattern. Merry Christmas to you and yours
Rebeca Tegon Vaz says:
Amei!
Janice says:
I can’t find where to print the Christmas Tree Table Runner
Janet says:
your comment was awhile ago, so I don’t know if you got a reply, but what I did was click on those 3 dots at the top right hand corner of the laptop and chose Print. From there I only printed out the pages I wanted (for me that was 3 through 6, but you could print all 8. I also chose ‘print both sides’ to use less paper. good luck
Hazel Walker says:
Loved getting this pattern. Sew cute and fun. TU!!!!
Pati says:
This is so so cute!!! I love it!! Thank you so much for sharing this super cute Christmas pattern!!! 😍😍
Laurie says:
What a wonderful and festive pattern you so kindly are sharing with us! Thank you.
Madonna says:
Thank you, Kristina, for the lovely pattern! It’s so cute as I love Christmas trees.
Kathi Ricklefs says:
This pattern was so fun and easy. Great directions….turned out so fun and cute.
Veronica says:
Your runner is A-dorable and your tutorial makes it look very manageable. Thank you. I need to make one for sure!🥰
Deb says:
So cute! I might have said “brilliant” out loud when I saw how you pieced the angles 😉
Thank you.
Karen says:
It is darling and I am headed off to make one ( or more) right now! Thank you.
Pamela says:
Thank you for sharing this fun and festive pattern. I need to sew faster to keep up with all your cute patterns. Merry Christmas. 🎄
Blicq says:
Bonjour. Je ne comprends pas les dimensions.qq un pourrai m.expliquer s il vous plaît?
Janice P Christopherson says:
Could you tell me what fabrics you used for this tablerunner?
Sharon Miller says:
I have never made a table runner but I love this pattern and my just try it tomorrow! Thank you so much!
Julie says:
Hi. I can’t find instructions for the backing, just to cut two 18” WOF pieces. Do I sew them together and cut to fit?
Nadja says:
😍 so lovely – thx for sharing with us
Nancy Eckert says:
You are always so generous with your adorable and DO-ABLE free patterns! Thought I was done with holiday sewing but I thought wrong. Thank you!
T. Johnson says:
Thanks so sharing this. This makes the merry in Merry Christmas extra special!
Vannicea says:
I have been wanting to make a runner like this! Thank you!
Susan says:
Awesome… thank you.. I will be trying it on monday!!
Dawn Reid says:
Thank you so much! Its super cute!
Karla says:
Thank you!
Anna says:
Thank you so much for this! Blessings 💗
Brenda Harder says:
What color thread did you use for quilting it? It blends in so well with all the different bold red and white fabrics.
Kathi Ricklefs says:
This pattern was so fun and easy. Great directions….turned out so fun and cute.
Dorothy Edwards says:
Just saw this post and absolutely love it. I want to make this next year. Thank you for sharing.
Mary says:
I got mine made this Christmas. My daughter and her family loved it. Her dining room table is really long so it worked out well.