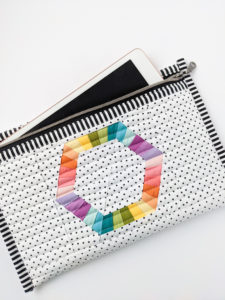
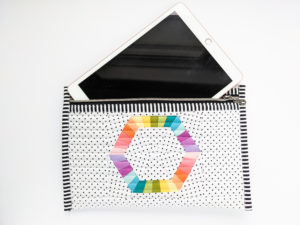
It’s not often that I work on a project that is 100% for me. But earlier this month, I started on a project that I will use daily. . . a quilted laptop sleeve! My iPad has been needing some protection, and making a zippered holder for it has been on my mind for at least a year.
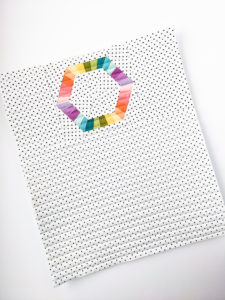
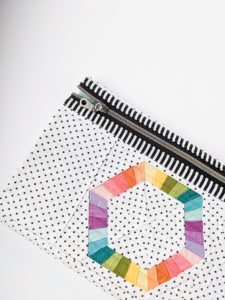
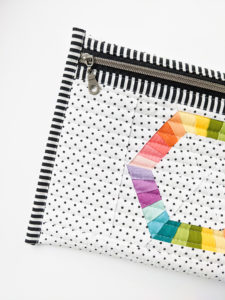
I wanted a bright, modern feel to the laptop sleeve, so I turned to a rainbow of Confetti Cotton solids from Riley Blake and used my new Geometric Hexagon FPP pattern to piece together a colorful hexagon for the front. My favorite Riley Blake Swiss Dots were perfect for the background and 1/8″ black and white Stripes as the binding finished everything off really well!
As I was planning everything out, I decided to keep track of all of my measurements and share them with you in a tutorial. I know from first-hand experience that getting started with zippers can be a bit intimidating, so I’m hoping the step-by-step instructions and full color photographs will help you see just how easy this project is!
The tablet sleeve tutorial is made to fit an iPad (measuring about 7″ x 10″), but I realize that tablets come in many different sizes, so read to the end for some additional instructions to adjust the tablet sleeve to fit your specific tablet! Changing the dimensions will require a little bit of math on your part, but it will be worth it for a fitted tablet sleeve!
And of course the tablet sleeve can be used for a variety of other purposes: book sleeve, first aid kit, English Paper Piecing project pouch, etc. I’d love to see your creativity, so if you use my tutorial, please tag me in any photos your share on social media. 🙂
Let’s get started with the tutorial!
Fabric Requirements:
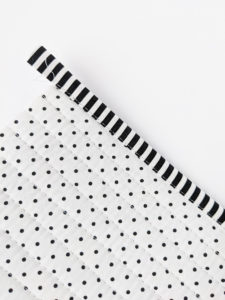
1 FQ for the outer fabric (I pieced my Geo Hexie FPP block into Swiss Dot fabric)
1 FQ for the lining (light aqua in this tutorial)
1 FQ for the binding (black and white stripes in this tutorial)
20″ x 20″ piece of Soft and Stable or batting
16″ or longer zipper
For a 7″ x 10″ iPad, cut a main panel piece (outside fabric), Soft and Stable (or batting), and a lining piece all measuring 14″ x 18″. Baste the three layers together using safety pins or Odif 505 basting spray.
After quilting, trim the panel to 12″ x 16″. Quilting (especially dense quilting) can shrink the panel, so it’s always a good idea to cut your original pieces a little large then trim to size after quilting. Before trimming, remember to center the panel if you have a focus fabric or quilt block incorporated into the panel.
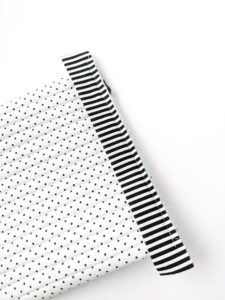
From the binding Fat Quarter, cut (4) 2 1/2″ x 21″ strips. Iron the strips in half length-wise, wrong sides together to form strips 1 1/4″ x 21″.
Sew one binding strip onto the lining side of one of the smaller 12″ panel sides using a 1/4″ seam allowance.
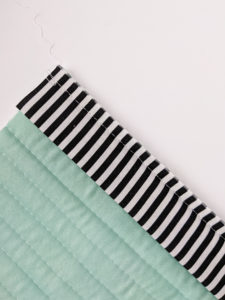
Turn the binding over the edge and around to the front of the quilted panel. Top stitch into place. Trim off any excess binding that hangs off the end (if you don’t trim it off in this step, we’ll get it trimmed off later with the zipper–you can see below that my binding is a little long on one side and that’s ok!).
Repeat with another binding piece on the opposite 12″ panel side.
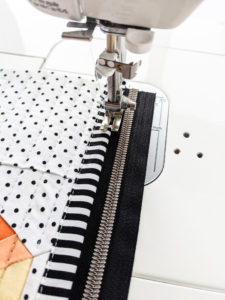
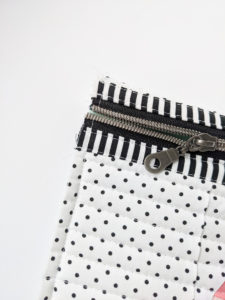
Place the zipper underneath one of the zipper bindings, both facing right side up. Sew the binding and zipper together, stitching right on the edge of the binding and leaving about 1/4″ between the zipper binding and the zipper teeth. Don’t trim off any excess zipper length yet.
Note: In these photos, I used a #5 handbag zipper. They are a little wider than standard zippers and, accordingly, are a bit easier to sew into pouches and bags. If you are using a standard zipper, it will be the same procedure, just make sure that as you are sewing, you are catching the zipper tape underneath the binding.
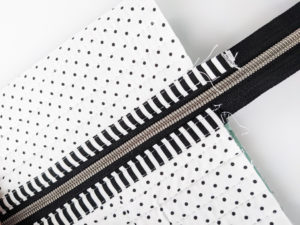
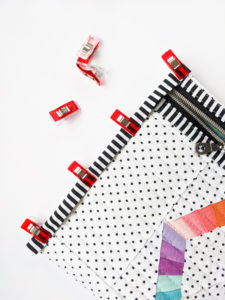
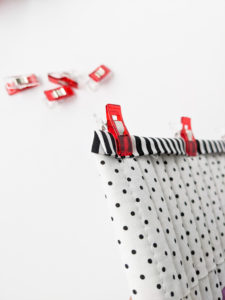
Fold the quilted panel up into a tube and repeat with the other side of the zipper and binding.
Tip: It might get a little tight maneuvering the fabric out of the way of the sewing machine needle. Having a little extra length of zipper on one side of quilted panel can help by spreading the zipper opening up a bit more. Alternatively, I’ll often remove the zipper pull when I’m sewing in a tight spot like this. After both of the zipper tape sides are sewn on, the zipper teeth can be reinserted into the zipper pull. It sometimes takes a couple tries to make sure both sides of the zipper binding line up correctly, but can save frustration with keeping the rest of the panel out of the way while sewing the zipper.
Close the zipper pull halfway (so it doesn’t get trimmed off!) and trim off any excess zipper or binding hanging past the edge of the quilted panel.
Fold the quilted tube in half and adjust the tube so the zipper binding is at the very top of the tube, right below the fold.
Sew down both sides of the panel with a scant 1/4″ seam to close up the tube ends.
Place the binding strip onto the back side of the panel and line up the raw edges with the raw edges of one of the sides of the quilted panel (that you just sewed in the previous step). Overhang the top end of the binding strip by 1″ then trim the other end of the binding strip so it, too, overhangs by 1″. Sew to the quilted panel using a 1/4″ seam.
Flip the binding to the front side of the quilted panel and hold in place with pins or Wonder Clips.
Flip the ends of the binding strips under the binding strip so all of the raw edges are concealed.
Top stitch along the edge of the binding strip to secure in place. Repeat with remaining side.
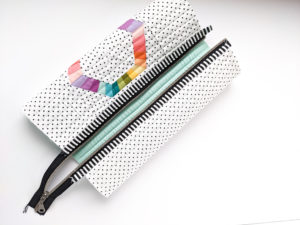
Now your tablet sleeve is complete! Slip your tablet into your quilted sleeve and be confident that your tablet is nicely protected.
Changing the Size of your Tablet Sleeve
Now for changing up the size to fit your specific tablet! This will require a little bit of math on your part–but it should result in an appropriately sized tablet sleeve.
Measure your tablet and label the smaller dimension as TW (tablet width) and the larger dimension as TH (tablet height). Cut your outer panel piece, Soft and Stable (or batting), and lining all to be:
TW times 2 + 4″ by TH + 4″
For example, if your tablet measures 8″ x 12″, cut your piece of fabric to be 8*2+4 by 12+4 (which is 20″ x 16″).
Continue on with the tutorial by basting and quilting your piece of fabric. After quilting, center and trim your quilted piece to TW times 2 + 2″ by TH + 2″ (so 2″ smaller in width and height than what you originally cut the pieces). Quilting often causes the panel to shrink a little, so make sure to remeasure the panel and cut off what is needed to make it the correct size. It’s very likely that you’ll have less than 2″ to cut off in each direction!
In the example above of an 8″ x 12″ tablet, after quilting the panel piece would be trimmed to 8*2 + 2 by 12 + 2 (which is 18″ x 14″).
For the binding strips, cut (4) 2 1/2″ x 21″ strips (if your tablet sleeve is quite small, you might be able to cut (3) 2 1/2″ x 21″ strips instead).
For the zipper, you’ll want a zipper that is at least 4″-6″ longer than your tablet height (the longer measurement of your tablet). The longer the zipper the easier it is to sew everything together, so leave as much extra length as you have, then you can trim it to the right length after sewing the zipper on.
Any questions? If there are steps that you have questions on, please let me know and I’ll go back and try to add in extra information to make everything clear.
Thanks for following along, and please share photos of your laptop sleeves with me! I’d love to see your version!
Happy sewing!