
I’m so excited that you want to make the Hemingway Pouch with me! I originally posted these Sew Along tips and tricks in February 2024 in conjunction with a Sew Along I hosted. I’m posting the daily assignments and bonus tips here to my blog for those who didn’t get a chance to join the Sew Along.
The assignment for the Hemingway Pouch Sew Along Day 1 is to cut everything out, then baste the Main and Lining fabric. Cutting everything out is pretty self explanatory, but I did want to mention a couple things. First, the Accent pieces can be cut from one fabric piece (as explained in the Cutting Instructions), but feel free to mix it up and use different prints if you’d like! You are definitely not required to use the same fabric for both of the Accent pieces. Second, if you are using a directional fabric for your Main print, pay close attention to the dimensions. Everything in the pattern is written as width x height, so make sure you orient your directional prints accordingly.
Now, on to basting our fabric!
PREPARE FOR BASTING
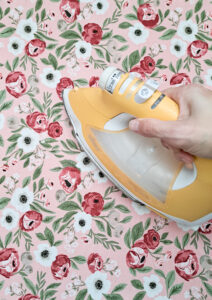
Before I start basting, I try to make sure that all of my layers are pressed really well. This will help everything lay smoother and you’ll be less likely to get puckers in the fabric when you quilt.
I’d even recommend pressing the batting or Soft and Stable (or other foam stabilizer–unless it’s fusible!) before layering. Both batting and Soft and Stable press well and having the wrinkles pressed out will really help all the layers stay flat.
BASTING
Basting is a way to temporarily hold layers of fabric together. We don’t want the layers to move around while we’re quilting, so we baste them for the best results.
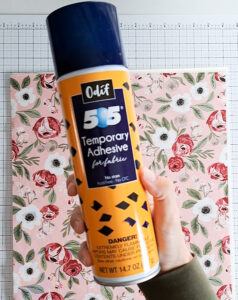
There are many different methods of basting (pins, adhesive spray, sewing long stitches, etc.). I’d recommend trying a few out so you can figure out which method you like best.
I prefer to spray baste smaller projects with Odif 505 (shown below), but I frequently use safety pins for larger projects.
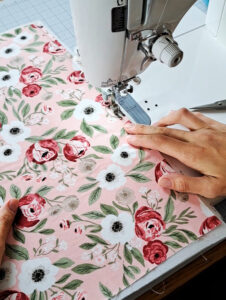
PREPARE FOR QUILTING
Once I have my layers basted, I choose a side of the panel that I can start most of my quilting lines from and stitch a line along one of the edges (just 1/8″ away from the raw edge) to stabilize the three layers.
Even though we’ve already basted, if you start your machine quilting from that stitched line as much as possible, it will further help keep the layers from shifting.
Those are my tips for Day 1! You can check out the video that goes along with the Day 1 assignment on my Instagram feed HERE.
Links for products from today’s tips:
Odif 505 Spray (click HERE)
Oliso Iron (click HERE)
Juki TL2000 Sewing Machine (click HERE)
Thanks for sewing along with me!
-Kristina