Have you made a buffalo plaid quilt yet? I made my first buffalo plaid quilt 3-4 years ago. It was red and black and made entirely from flannel (in other words, it weighs a ton, but is well loved during wintertime!). I didn’t realize that there were any online tutorials, so I figured out the fabric requirements and cutting instructions myself (which really isn’t a difficult task since you’re just dealing with squares).

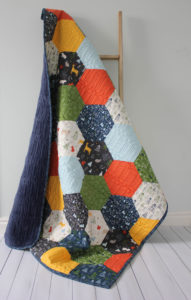
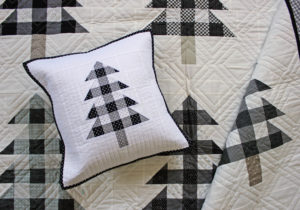
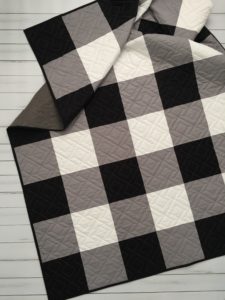
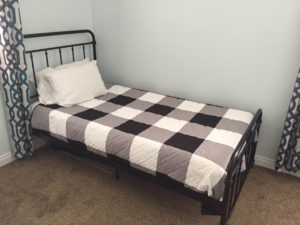
A few months ago, we got a new bed frame and mattress for our boy and I thought a black and white buffalo plaid quilt would be perfect on his new bed. This time around, I wanted to make the plaid jumbo sized for a big impact and fast finish. I chose Riley Blake’s Confetti Cotton because it has such a softness to it. If you haven’t tried their solids lately, you really should–they are so soft to the touch!

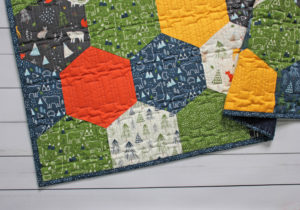
The backing is flannel (Riley Blake Kisses in Steel) so it’s still warm and cozy, I quilted it with the Too Simple pantograph, and bound using Confetti Cotton solid in black.

I realize that there are many other online tutorials, but wanted to share the specifics for my jumbo plaid quilt, so I’ve added a tutorial below. Enjoy!

Finished Quilt Size: 67″ x 86″

Fabric Requirements:

Black: 1 1/2 yard
Gray: 2 1/4 yard
White: 1 yard
Backing: 4 yards (with a vertical seam in the backing)
Binding: 1/2 yard

The fabric I used for the quilt top is Confetti Cotton solids in Black, Riley Gray, and Riley White from Riley Blake Designs.

Cutting instructions:

Black: cut (5) 10″ x WOF strips. Subcut into (20) 10″ x 10″ squares.
Gray: cut (8) 10″ x WOF strips. Subcut into (31) 10″ x 10″ squares.
White: cut (3) 10″ x WOF strips. Subcut into (12) 10″ x 10″ squares.

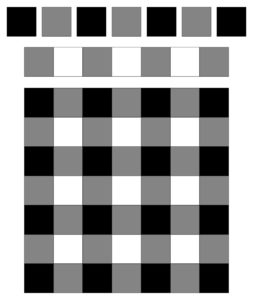
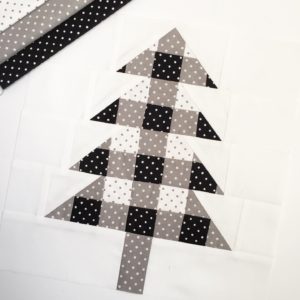
Assemble the quilt top:

Layout the black, gray, and white squares as shown below. Sew the blocks into rows, pressing seams toward the gray squares. Sew the rows together, press all seams in one direction.

I can never get enough of a good rainbow gradient–so cheerful and always puts a smile on my face! When I saw that Sandy Gervais was putting out a fun new basic line called Texture with Riley Blake, I knew the vibrant colors would be perfect for my new Kaleidoscope FPP pattern.

I started off by making some 4″ x 4″ blocks from the Kaleidoscope foundation paper piecing pattern (found HERE). Since I wanted a gradient of colors, I made sixteen blocks total: one red block, two orange blocks, three yellow blocks, four green blocks, three blue blocks, two purple blocks, and one pink block. Those numbers gave me a good flow of colors from corner to corner.

The Kaleidoscope blocks sew together pretty fast since there are only a few seams in each one. and it was fun to add the colorful blocks to my pile and watch the rainbow come alive.

After making the sixteen blocks, they were sewn together into a 4 x 4 panel (it measures 16.5″ x 16.5″ and is the perfect size for a pillow cover, although I’m thinking I’d like to save it for a different project). The paper backs have all been removed and now I’ve just been enjoying the splash of color in my sewing space.


The colors of the Riley Blake Texture fabric is mesmerizing and while I absolutely love the colors all together, each color is wonderful on its own, too! I used thirteen colors in my Kaleidoscope panel, but you can see there are many more colors in the Texture line to play with!

Ode to a Nine Patch Block

Roses Are Red
Violets Are Blue
I love a nine patch
And I hope you do, too!

Nine patches are such a classic quilt block. They are no fuss, simple, predictable, but oh so versatile and fun! So when Amanda from Broadcloth Studio had the genius idea to do a Quilt Block Soul Mate quiz and asked me to contribute a block option, I knew I wanted to go with the nine patch (because, let’s face it–I can relate to the nine patch block because I’m simple and predictable, too). 😉

If you haven’t taken the Quilt Block Soul Mate quiz yet, you can check it out HERE and let me know what quilt block you’ve matched up with! It’s no surprise that when I took the quiz, I was matched up with the nine patch block! Haha.

Since I love nine patch blocks so much, I thought it would be fun to do a little round-up of some great nine patch tutorials and patterns that I’ve been admiring. So sit back, relax, and let’s see just how awesome the nine patch block is!

Nine Patch Quilt Block Tutorial by Simple Simon & Company

Nine patch blocks are just a grid of 3×3 squares, but have you ever tried strip piecing them? Simple Simon & Company has a great tutorial to show you how to quickly make nine patch blocks by strip piecing 2.5″ precut strips. It’s such a great time saver! You can check out the nine patch block tutorial HERE.


Basic Irish Chain Quilt Pattern by Andy from A Bright Corner

One thing I love about the nine patch is that you can pair it with solid squares and you suddenly have an Irish Chain quilt! Andy from A Bright Corner has a great pattern to show you just how easy it is to make an Irish Chain Quilt. Check out her free printable pattern HERE.


Disappearing Nine Patch by RebaLeigh Handmade

If you haven’t seen or heard of a Disappearing Nine Patch, you’ll have to check this free pattern out! Someone, somewhere had the brilliant idea to make a nine patch, cut it in half both ways, reposition the pieces, and sew them back together to make a new design. It’s so clever–and fast, too! Head to RebaLeigh Handmade’s blog for her free printable pattern, First Crush Charm, that goes over the disappearing nine patch block step by step.


Nine Patch Plus Quilt Pattern by Center Street Quilts (me!)

It’s pretty much obligatory that I include one of my own patterns in this round-up, right?!? I designed this Nine Patch Plus pattern to be a scrappy, modern mashup of a nine patch block and a plus block. So if you’re looking for something off the beaten path, check out my Nine Patch Plus quilt pattern HERE.


Star Patch Pattern by Gigi’s Thimble

Looking for a nine patch quilt with a twist? The Star Patch pattern from Gigi’s Thimble has darling nine patch blocks set on point around a jumbo star. Super cute, right? You can find the Star Patch pattern HERE.


After seeing all these fun nine patch patterns are you just as pumped about nine patches as I am? My scrap fabric pin is just begging me to make one or two of these! 🙂

Are you ready for the easiest ever baby quilt? Meet the Ombre Blossom quilt! You better get your iron turned on and warmed up now because you’ll have the quilt top together before it has time to heat up all the way! 😉

The Ombre Blossom quilt top takes just four half yard cuts of fabric (I used Raspberry, Lipstick, Peony, and Baby Pink Blossom prints from Riley Blake). Trim the half yards to 15.5″ x 42″ strips and sew the strips along the 42″ sides from lightest to darkest (or whatever order you like). 🙂 That’s all it takes and you have a 42″ x 60″ baby quilt top ready to be quilted!

For my pink Ombre Blossom quilt, I used Dreamy Dimple Minky in Peony for the backing, quilted it with the Rainbow Hearts digital quilting design (available from Intelligent Quilting), and added a sweet light pink binding (Riley Blake 1/4″ stripe in Baby Pink).

If pink isn’t your thing, you’re in luck because Riley Blake has over 60 colors of Blossom! An Ombre Blossom quilt in blue or green would be just as perfect–or just choose four of your favorite colors for a fast and fun baby quilt.

If you make your own Ombre Blossom baby quilt, please tag me on social media using the hashtag #centerstreetquilts!

Happy sewing!


One of my favorite fabric designers is Elea Lutz. Elea has such sweet designs; combining charming florals and cute little animals to create irresistible fabric collections. I’m always eager to see what she’s working on and I’m excited to join in the blog tour of her latest collection with Riley Blake Designs, Milk & Honey.

Along with Elea’s usual stunning floral and animal prints, Milk & Honey includes a fabric panel with oversized metallic designs that are perfect for a variety of projects. I used my panel as centers for simple courthouse steps blocks and love the result.

The individual designs on the panel were each 8″ x 8″ to start, so after cutting out the fourteen panel designs, I chose twelve to use as the centers of my blocks. Using other prints from the Milk & Honey fabric line plus a few Riley Blake basics (pink and white Stripes, Blossom in Peony, and Shabby in Cottage), I added 2-1/2″ strips around the outside of the center panel to make twelve 20″ x 20″ blocks (with an 8″ x 8″ center, each block needs (2) 2.5″ x 8″, (4) 2.5″ x 12″, (4) 2.5″ x 16″, and (2) 2.5″ x 20″ strips).

The quilt was finished off with a loopy quilting design called Knit 1 Purl 2 and bound with a subtle stripe from Milk & Honey. I think I might just have to claim that this is our official Easter quilt this year–the colors and cute animals remind me of a happy Spring day.


Milk & Honey is available in stores now, so ask your local quilt shop about it!


Since Thanksgiving I’ve been on a mission to finish some of the quilt tops I have been working on. The first quilt on my list was this fun Farmhouse Christmas quilt in a colorful, cheery colorway (I called it my Merry and Bright Farmhouse Christmas quilt). The photo above is what it looked like at this time last year–the quilt top was finished, but I didn’t make it farther than that.

I quilted it in this fun geometric design called Compass. The design reminded me of retro stars that would go on top of the Christmas trees.

The backing is a green Cotton + Steel deer print–I just love those cute deer! For the binding, I chose a fun Cotton + Steel snowflake print. I didn’t use it anywhere else in the quilt, but it was too perfect to not use.

I even took the time to hand bind the quilt (I usually machine bind them). I had the perfect Aurifil thread on hand–Blossom Pink (#2530)–and got to watch some of the Great British Baking Show while I was at it.

I love how this Farmhouse Christmas quilt turned out and love that we have another fun Christmas quilt to snuggle this winter.

You can find the Farmhouse Christmas quilt pattern in my Etsy shop.


This is a sponsored conversation written by me on behalf of Cricut. The opinions and text are all mine.

I’ve owned my Cricut Explore Air 2 machine for a couple months now and have loved having it around! Since I wasn’t too familiar with Cricut machines or their capabilities before owning one myself, today I thought I’d share five reasons why I love my Cricut for anyone considering purchasing one.

1. My Cricut is super easy to use! I was a little nervous about the learning curve, but between the intuitiveness of it all and the useful info on Cricut’s website (they have an awesome help section HERE) I’ve been able to easily figure out everything I need to do. My favorite useful feature is probably the dial right on top of the machine–no guessing as to what settings to use–just pick whatever material you’re using and you’re set to go!

2. Speaking of materials, the Cricut Explore Air 2 cuts over 100 materials! Say what?!? Now, I’ve only tried out about five of those 100 materials (cardstock, Premium Vinyl, Everyday Iron-on, Infusible Ink, and Adhesive Foil), but I’m adding a lot of other materials to my Cricut to-do list (like leather, window cling, and felt). The versatility blows my mind a little and I love having this handy machine and the crafting possibilities it provides at my fingertips.

3. It’s a little silly how excited I was when I found out that my Cricut had Bluetooth, but Bluetooth capability means less cords! I was able to easily pair the Cricut machine to my laptop, but it also works with your Bluetooth enabled computer or mobile device (phone, tablet, etc) to make creating easier. Less cords = happy crafter. 🙂

4. There are SO MANY fun designs in the Cricut Design Space library! Seriously, go browse the designs and your mind will go wild thinking of all the fun creations you could make.

5. And one of the biggest reasons why I love my Cricut is because it allows me to make unique and personalized gifts. There’s just something special about handmade gifts and having a Cricut opens the doors to so many new crafting options. For Christmas, I decided to have one of my girls help me make our neighbors some little wood ornaments. We had so much fun making them together and even more fun giving them away.

These cute little ornaments are super simple–you can easily make your own following the tutorial below.

Supplies Needed:

Cricut Explore Air 2

Cricut Cutting Mat (I used the light grip)

Premium Vinyl Permanent in black

Transfer Tape

Cricut Basic Tool set

Wood slices with hole pre-drilled

White acrylic paint

Paint one side of the wood slices with the white acrylic paint, going almost to the outside edge. This is totally optional, but I felt like it would help the vinyl stand out more.

Cut out your desired shape using the black vinyl and your Cricut cutter. My wood slices were about 2″ in diameter, so I sized my shapes to be about 1.5″ x 1.5″. Remember to set the dial on the top of the cricut to vinyl. You can find the snowflake design in Design Space here and the deer design here.

Weed out any excess vinyl using the weeding tool. We did two different designs and the deer shapes were super easy to peel away the excess vinyl, while the snowflake shapes took a bit longer. My 7 year old daughter loved to weed all those tiny pieces off, though, so after cutting the vinyl with the Cricut, I gave it to her and she went to town getting the shapes ready to transfer!

Using Transfer Tape, transfer the shapes one at a time to the wood slices. Our shapes weren’t complicated or very intricate, so this process went really smoothly.

Add a ribbon to the wood slice and enjoy your darling ornament!

About ten years ago I found the blog Lil Blue Boo. I was extremely inspired by everything that Ashley shared there, but was particularly enthralled by the knit clothes she made. Around that same time, a sweet neighbor gave me a serger that she never got around to using, and I knew it must be a sign that I had to at least try some knit sewing!

I purchased several of Lil Blue Boo’s patterns (you can still find them on Etsy here) and particularly loved making the Sienna dress pattern when my oldest two girls were toddlers.

When I recently discovered that Riley Blake Designs turns some of their best loved prints into knits, I knew it was time to dust off the old serger! And as a bonus, I have a third girl who is now the perfect size to use the same beloved Sienna dress pattern for.

I choose several prints from the Blooms & Bobbins knit collection along with a coordinating gray and white 1″ stripe (also from Riley Blake Designs). The knits are all 95% cotton, 5% spandex (which is my favorite to sew with!) and are 60″ wide. I was glad to see that my knit sewing skills are still around and I had the Sienna dress made in just one evening! After the dress was completed, it totally needed some matching pants, so I used another favorite knit pattern (Rings of Ruffles by LilyGiggle) to create coordinating leggings.

The end result is a super sweet knit outfit. I just can’t get enough of those gorgeous florals and am so glad that I took the time to revisit a past hobby.


Finding cute boy prints isn’t the easiest task, so when I saw the new In the Forest fabric line from Riley Blake Designs with its darling woodland creatures, I knew I had to snag some up for a boy quilt!

I wanted a modern quilt design, and thought the prints would look great in a hexagon quilt. Instead of cutting out all those hexagons myself, I used the AccuQuilt GO! Hexagon Die to quickly cut out perfect hexagon shapes. Plus, the hexagon die has little notches to help align the shapes as you’re sewing them together. Brilliant, right?!?

If you’ve never sewn hexagons or Y-seams, you need to head over to the AccuQuilt blog where I just shared a tutorial on how to sew this easy quilt top. The large hexagon shapes are the perfect choice for a first-time Y-seam project and you’ll love adding Y-seams to your repertoire.

Dreamy Minky in navy was the perfect backing choice and I quilted it in a modern line pantograph (called City Windows).

If you are like me and always on the hunt for adorable boy prints, be sure to check out In the Forest from Riley Blake!

If you’ve ever been over to my Etsy shop, you’ll know that I have several patterns where instead of using plaid fabric, the plaid sections are all patchwork pieced. It’s a great way to get a perfectly aligned plaid section in the shape and color you want! You just choose a dark, medium, and light/low volume print and you’re on your way to making your own plaid block. With the block below, I choose several Riley Blake Swiss Dot prints to make an easy plaid tree: black for the dark print, gray for the medium print, and a low volume gray dot on white for the light print. It’s always so fun to see the block go from just a few prints into a perfectly plaid quilt block!

This plaid tree quilt block is from my Farmhouse Christmas pattern. The pattern includes instructions for the full quilt (shown below), along with a bonus half-sized block that’s perfect for pillow covers, table runners, or mini quilt. I used the half-sized block pattern for the swiss dot tree block and love how fun it is made up into a quilted pillow cover.

Farmhouse decor has been so popular lately and I love bringing in a little plaid to my Christmas decorations, too.

If you prefer to go with non-traditional plaid colors, Riley Blake has a ton of Swiss Dots to choose from to make your plaid trees perfect! Just choose a dark and medium shade of the color you want, add a low volume or white print, and you’ve got a plaid quilt block in the making.